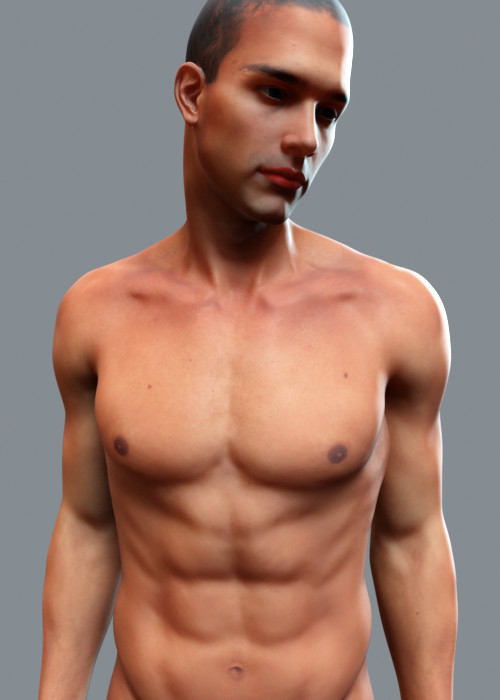
Review: The Complete Guide to DAZ Studio 4

complete guide to daz studioI’d like to thank Packet Publishing for supplying me with a reviewers copy of The Complete Guide to DAZ Studio 4. Available: Amazon, Kobo, Booksamillion

Paolo Ciccone is a reasonably well known chap within the Poser/DAZ Studio community with his Reality line of products for both pieces of software. The Complete Guide for DAZ Studio 4 is not his first foray into training material. He has released his video “Make Your Own Reality”, “Blender Survival Guide”, produced the “Reality 3 Master Class” (Poser), and other assorted tutorials on YouTube. Right from the get-go I’ll say that Paolo is concise and clear in delivering his information, something that is always appreciated.

This book does not however live up to its title. It is not really a Complete Guide in any but the broadest sense. Perhaps, Complete Beginners Guide. To be fair, many of the subjects left out are reasonable exclusions, such as painting weight maps and other advanced content creation tools, which the vast majority of users will make little or no use of. There are some glaring omission, such as a discussion of render settings for 3Delight, DAZ Studio’s standard render engine. Many new users have trouble with these controls.

Another area Paolo leaves out is a thorough look at configuring common materials such as metal, glass and skin (or any materials at all) for 3Delight. The cynic in me sees Paolo going about setting up 3Delight as a stick-man ripe for LuxRender and Reality to come in and push over with its catalogue of precooked physically accurate materials. Indeed, the item that Paolo uses to demonstrate the inferiority of DAZ Studio’s materials seems to be picked based on its virtue of being so terribly configured (possibly configured for Poser?). Even a brief beginner oriented exploration of materials would have yielded something far superior.

Paolo claims to have attempted some level of impartiality with his discussion of the merits of 3Delight and LuxRender/Reality, but to me this is very suspect. Biased or not, 3Delight is the render engine DS is integrated with and the one most users will use, so it would have been great to see working with it covered in more detail.

The last area of criticism revolves around the inaccurate way shadow maps and raytraced shadows are introduced in chapter 5. Paolo states that raytraced shadows are always perfectly crisp and that in many situation shadow maps would be preferable. After reading this section I spent some time writing in great detail about how this was terribly wrong and how raytrace produced more physically accurate results, and blah, blah, blah. I won’t bother to reproduce that information here as Paolo produces correct information in following chapters. Why not start out with correct information though?

Other than these criticisms the book is, as already stated, presented in a concise and easy to digest manner. There is no waffle, just good solid information.

Putting together a quick scene and navigation DS
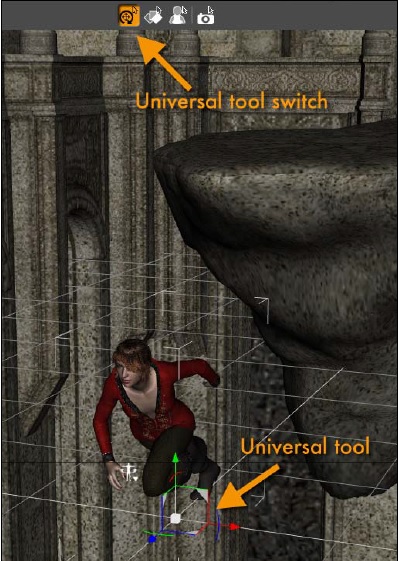
complete guide 1Chapter 1 introduces us to the basics of the DAZ Studio interface and how to tweak the layout for a more rapid and open workflow. We’re also introduced to loading content, Genesis, and auto-fitting clothes and hair.

Shorter shortcuts

Chapter 2 follows up on the user interface tweaks by showing us how to shorten unnecessarily long shortcuts. For me, even as someone who has been using DAZ Studio for a number of years, Paolo’s tweaks are very useful.

Posing Genesis

Chapter 3 deals with posing, and covers the many tools we have at our disposal for creating just the look we need. Paolo also offers up some tips for making poses look more realistic (not like rigid plastic figures). Chapter 4, a nice progression from the previous Genesis focused chapters, covers the creation of unique and interesting characters by mixing and matching Genesis based morph packages and characters.

Basic scene construction, lighting and rendering

Chapter 5, while introducing some questionable information about the properties of raytraced shadows, offers up a lot of great information on the fundamentals of lighting and composition. Paolo talks about camera positioning, lighting and the role shadows play. There is also some useful information on rendering.

Content Installation and Content Brokerages

Chapter 6 is all about finding and installing content, free and otherwise. We are taken on a good look at the big three stores that most DAZ and Poser users will visit. The information about DAZ 3D is somewhat outdated as the site has changed a good deal since this section was written. There is a section on installing content with DIM later in the book.

Chapter 7 fixes up the incorrect information about shadows introduced in chapter 5. There is a lot of great introductory information about lights and settings, cameras and adjusting depth of field and the effects focal length can have on an image. There is a lot more general 3D basics information and stuff about navigating DS in here too.

Building a Scene

Chapters 8 builds on elements already explored in earlier chapters covering scene construction, character posing, conforming clothing, fixing poke through. There is a reasonable explanation of DAZ’s default shader properties and how to edit them, but there is no demonstration of how to produce a reasonable material though. This is a shame as even the basic shader in DS can produce some nice looking metal and plastics, and depending on style, can deliver reasonable skin.

Lighting for 3D
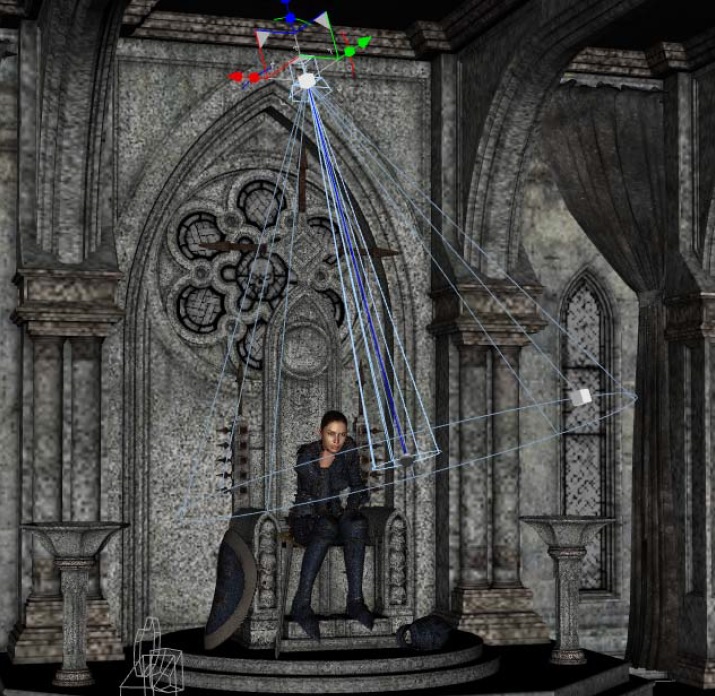
complete guide 2Chapter 9 has more detail on light as we are walked through the process of lighting a rather nice final image, so lots of good pointers here including the incorporation of some techniques used in traditional film and photography. Paolo touches on monitor calibration, a topic which any artist with a little experience under their belt will know is of significance importance. It is a shame that only software/hardware solutions (that cost money) are mentioned when simple DIY approaches, which are more than sufficient for most users, are not acknowledged.

LuxRender and Reality

Chapter 10 gives a solid introduction to LuxRender and Paolo’s baby, Reality. For those that are unfamiliar with LuxRender it is a physically based and unbiased render engine. This means it calculates light and its interaction with materials as accurately as possible/practical, and therefore produces images that are usually more-or-less accurate. Here we find out, that while physically accurate materials can be produced for 3Delight, it is an incredibly involved process. Lux and Reality, on the other hand, offer these delights from the get-go.

I felt Paolo fell far short of his stated intention for objectivity, but can we blame the guy? Reality is his baby and it is a fine bridge between DS and Lux, which in itself is an amazing piece of free software. Maybe I’m just touchy so many in the DS/Poser community seem to be buying into the myth that 3Delight can’t do realism, or that it is so terribly hard. This is not the case. Yes, creating physically accurate materials does require a lot of knowledge, but getting to that “close enough is good enough” is not so hard at all.

Regardless of any bias, LuxRender and Reality are worth considering for any DAZ Studio user. Lux is an increadibly complex and powerful render engine, and Reality does a lot to simplify the process of working with it. Though even then, Lux is not always easy to work with and does require a good deal of trial and error, visits to the forums and the Wiki.

Content Creation for DAZ Studio

Chapter 11 takes us into basic content creation, from exporting a template figure (Dawn in this case) from DAZ Studio, to modelling a basic dress with Modo (complete with UV mapping), and then finally bringing it back to DS where it is rigged and prepared for use with Dawn. While Paolo uses Dawn and Modo to demonstrate the workflow, the basic principles can be applied to any weight mapped DS native figure (such as Genesis), as it can be applied to any 3D modelling software. Through this chapter we see that taking the plunge into making our own content isn’t really that scary.

Animation The DAZ Studio Way

Chapter 12 explores the basics of animation, and the idiosyncratic approach that DAZ Studio adopts. We are also introduced Keymate and Graphmate which bring some much needed tools found in more complete animation software. This chapter contains so much useful information for anyone considering a foray into animation, to avoiding common time consuming disasters, and encoding final sequences for playback.

The Complete Guide to DAZ Studio 4 – Conclusions

The Complete Guide to DAZ Studio 4, might not cover everything new users will need to know, and it has little to offer seasoned users, but it is a solid starter for any new user. This book answers so many common questions, and will shave days, weeks or maybe even months off the usual flailing about process. I would have no problem recommending the book for those new to DAZ Studio.

For seasoned users there might be a chapter here or there that offers a reasonable introduction to subjects they have not ventured into (such as LuxRender, content creation, or animation), but for those more advanced users looking to branch into a new area there might be more complete sources out there.

Available: Amazon, Kobo, Booksamillion


Rooster Teeth/RWBY Animation Pannel

Just a quick post here. I came across this Rooster Teeth animation panel filmed in Melbourne Australia. There is a lot of RT waffle and banter, but for those interested in 3D animation from about 35 mins in to about 55 mins there is some really good stuff about the animation process of RWBY. Monty talks about working with Poser, time saving trickery, using 2D assets, quick and cheap particle effects, and demonstrates some technique in Maya. Monty also demonstrates how Poser 2014’s bullet physics will be implemented in future episodes of the show for elements such as hair, clothes, and of course, the all important bouncing of breasts.

All-in-all there is a lot more meat on the bones of this panel in terms of Poser related stuff than the RTX panel, but again most of the audience were happy to ask questions about weapons and characters, so other than that 20 min window there are only a few little sound bites here and there for the 3D crowd.

Artist Feature: Eliane CK


Free Tools and Content for 3D Artists

penny diver

Penny Diver

Eliane Camargo (aka Eliane CK) is undoubtedly one of the best known, and influential artists of the Carrara community (as well as the broader DAZ/Poser community). Her works are instantly recognisable and inspire everything from revulsion to awe and everything in between. Eliane is a master of lighting and shaders and moves easily from one render engine to another.

Eliane’s images are a punctuation of colour and light amid low-key environments. Often characters are composed of or wrapped (and/or embedded) in elements as unassuming as the surrounding environments, but it is the splash of colour, the contrast of matt, reflective and flesh surfaces, and clean, realistic lighting that draws us into the artist’s imagination. We ponder these images.

What we are met with at face value, is a mish-mash of eroticism, transhumanism, and fashion parade presented through a science fiction lens. We see wonder, exploration, joy, pain, suffering, beautify and the repulsive. We are invited to let out mind wander to questions about what it is to be human, the nature of consciousness, and the relationship between humans and technology. At least this is what comes to me when viewing Eliane’s works. The artist, herself, is reluctant to comment on what these images are about, instead encouraging the responder to explore at will.

think

Think

Jim: In all your interviews I read, I have never found how or when you started with 3D. What was your first experience with 3D? Was it something you instantly knew you wanted explore?

Eliane CK: I started in 2006 with Poser, just for fun, after that, DAZ 3D and finally Carrara.

Jim: You can see the beginnings of your unique and very recognisable style with your early renders, but looking at your Renderosity gallery you can really see it significantly in the last quarter of 2008 and fully formed by mid-2009. Was the rapid development of your signature style a conscious effort, or is it more about mastery of Carrara? Continue reading

DAZ 3D Michael 6 Review

M6After what feels like a decade since the release of Victoria 6 and Genesis 2 Female we finally have Michael 6 and Genesis 2 Male. Join me for the full epic review! I’d originally planned to have this review out sometime on the day of release, but I found myself wanting to know more of the technical details and the why, and why nots. So, here it is, a little later than expected, but far more epic and detailed than previously envisioned. Basically I have covered everything I would have liked to cover with the original Genesis 2 release (Victoria 6 review). But, but, but let me cut straight to the heart of the matter. Genesis 2 Male and Michael 6 are just as significant an improvement over their Genesis counterparts as V6/G2F was over theirs. This is to say that the G2 mesh, upon which M6 and V6 are based on, is head and shoulders superior to Genesis. The weight maps are better and we’ve got some interesting new bones to play with (and no, not that sort of bone you are thinking of right now).
While many DAZ Studio users have stuck with generation 4 and G1 figures (with the overwhelming majority of Poser users sticking with Victoria/Michael 4), DAZ has proclaimed that G2 is hugely successful. There has been a good deal of speculation over just how successful G2 has been, and how DAZ 3D define the word “success”. Let’s not bother with that debate any further here.

In terms of versatility Genesis (1) wins hands down. The ability to morph from female to male and use all morphs in between, textures, and apparel from either gender is much more efficient and convenient than having a split base which only shares some compatibility. However, for those looking for greater detail both in terms of geometry and articulation, then Genesis 2 can’t be beaten. Let’s explore further.

Genesis 2 Geometry Improvements

Genesis 2 (therefore M6 and V6) has only a couple of thousand more polygons than G1, but those few extras have certainly been put to good use to bolster facial details, as well as better detail in hands, knees and feet. The torso has also seen geometry tweaks, which, only having a vague understanding of organic modelling, I speculate also makes for cleaner, more detailed morphs.

It is perhaps ironic that the Genesis 2 Male and Female bases share many of their greater details with Generation 4 figures such as Michael and Victoria 4 (which are again both derived from the same base mesh). This is not to say that G2 is a mere knock-off of its predecessor. G2’s mesh is much cleaner and logically composed to make the creation of morphs easier. G1, by comparison, could achieve a nice smooth mesh, but lacked the greater detail of gen 4 figures.

Subdivision Surfaces, Weight Maps and Bones

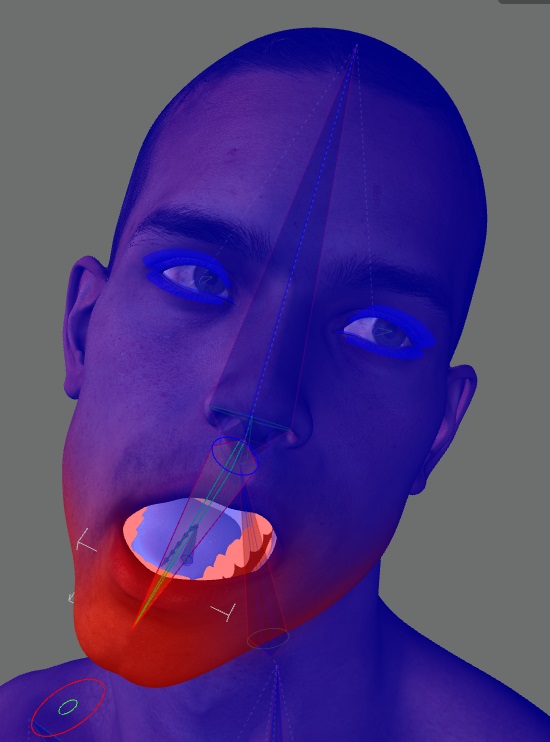
Michael 6 3d figure rigged jaw showing weight maps.The major advantages Genesis 2 has over the older Generation 4 figures lay in technological advances. V4 and M4 both have about 68 thousand vertices, while G2 is composed of about 22 thousand. G1 contained slightly fewer than G2, but suffered somewhat as a result. G2 effectively packs into its 22k verts what gen 4 packs into almost 70k, and it does this with (what most of us are well aware of by now) subdivision surfaces – a clever algorithm that can be used to create highly detailed geometry from lower polygon models.
The rest of the advantages Genesis 2 has over all the previous generation of DAZ figures is the greater articulation of joints. Part of this is due to refinements of weight maps, which generation 4 figures don’t have at all (other than a third-party weight mapped V4 for Poser). Weight maps (assuming they are done well) allow our figures to bend realistically. A good deal of the refinement of G2 weight maps is in having separate weight maps for the male/female variants. With the original Genesis figure, for example, the V5 and M5 shared the same weight maps. This is all fine and dandy for 90% of situations but, having properly weighted breasts is very handy, especially for animation and more realistic/detailed still images.

Perhaps, more important than breasts are the other areas of articulation that Genesis 2 has over G1 such as the rigged and fully weight mapped jaw and toes. G1 does have a bone in its mouth but it doesn’t seem to have much practical use and has no weights (still talking about family friendly bones here). Why G1 never had a properly rigged and weighted jaw, I don’t know. In any case this addition to G2M/F allows for a greater flexibility in crafting expressions and other effects, such as say, taking a punch to the jaw, as well as realistic jiggly bits. DAZ also make some mention of articulation of the ears, but I haven’t come across much to do with that.

So that’s the basic figure covered. Let’s move on.

Auto-fit with Genesis 2 Male/Michael 6

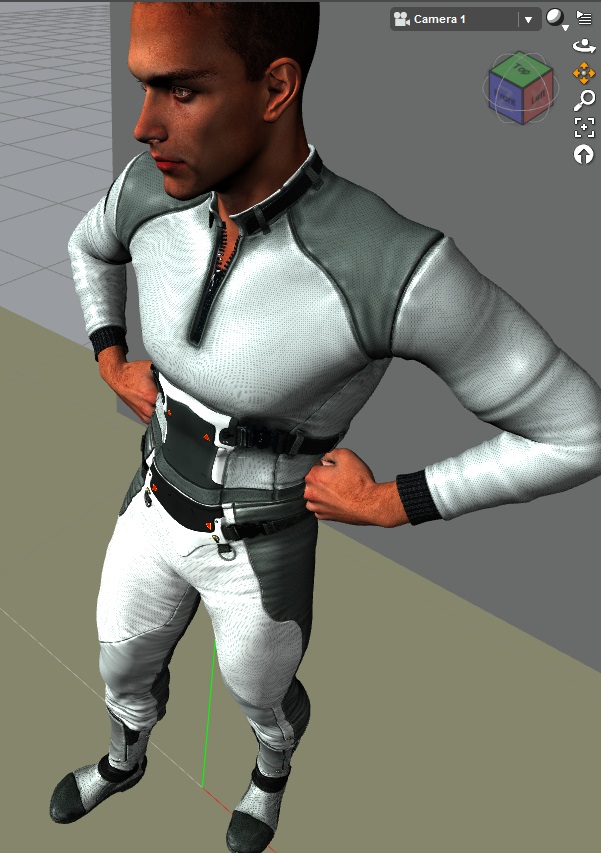
Genesis 2 Female outfit auto-fited to Michael 6

Rogue Sci-Fi Suit for V6 fitted to M6.

While Genesis 2 Male/Female might have a split base, the auto fit from G2F to G2M works very well, even a couple of dresses converted reasonably well, though it does get a little rough if you want the legs to move much (or a little bit). For whatever reason DAZ didn’t see a need to include a skirt/dress template for G2M’s auto-fit. Auto-fit from Genesis seems to work equally well, but with the same glaring omission of cross-dressing shenanigans, at least as far as dresses and skirts go.

The third party M4 Shapes For Genesis 2 Male (by Slosh) is very good, fitting most M4 apparel smoothly. The biggest win M4 fits for G2 figures has is fitting boots. In these situations the refitting of boots is a huge improvement over gen 4 fits for G1, which was stunningly terrible. The auto-fitting of boots is equally and perhaps better for V4 > G2F. M4 for G2M does have some shortcomings, but I should say right now that the creator of the product is aware of the issues and is working to fix what is reasonably possible.

autofit malfunction

Waddaya mean draft?

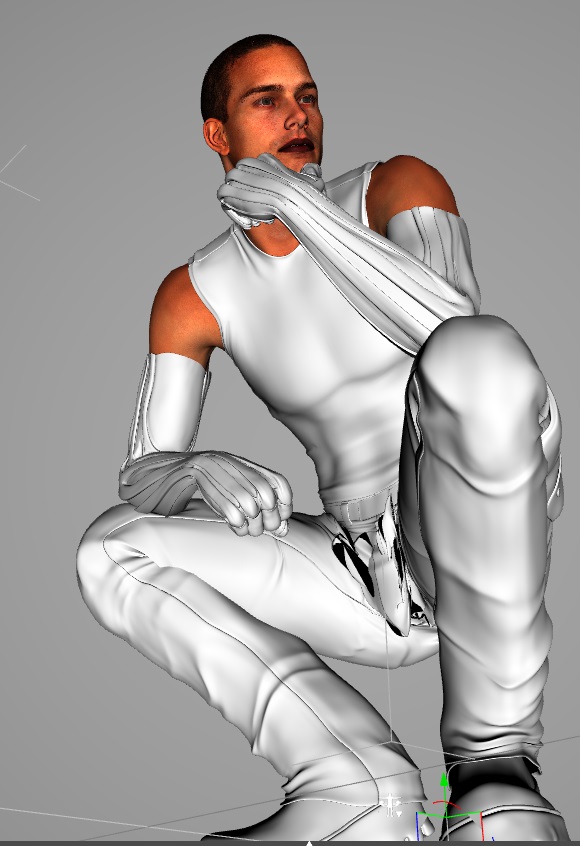
One issue that carries over from Genesis auto-fits of M4 products shows up when G2 is posed in crouching positions. In these poses many sets of fitted M4 pants have very noticeable geometry distortion in the crotch. G1 has an extra card up its sleeve when it comes to fitting pants – the inclusion of tight and loose fitting pants templates. G2 on the other hand, without a loose fit template, items like baggy pants tend to suffer greater distortion. Even then, G1’s greater range of templates doesn’t fix all issues.

Another problem area, but less severe, and apparently fixable (in the works), is with glove items. While some apparently work fine, I tried two pairs and both had a lot of wobbly polygons. Adding a smoothing modifier and converting to subd often goes some way to fixing issues, but in my experience the hands (finger tips at least) would have to be hidden for large renders or close-ups.

What’s clear is that auto-fitting is a simplification of a complex problem. More complete solutions involve creation of custom fitting morphs and editing weight maps, something that a good many DS users wouldn’t want to touch with a really big stick.

Converting M4 Textures to G2M

Related to auto-fitting apparel we have UV and texture compatibility. Out of the box G2M and female are virtually interchangeable when it comes to applying textures – just load the material settings from the desired G2F character – simple as that. Out of the box (“box”) G2M also supports textures created for the M5 UV. Unfortunately there is no current support for any of the other Genesis based UV sets, such as Freak, David etc.

M4 Shapes For Genesis 2 Male allow refitting of M4 UV/textures to G2M. Slosh has

Squished

Squished

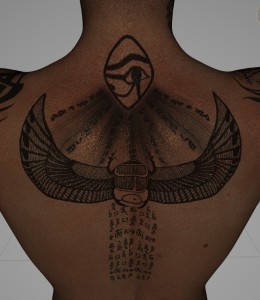
done (yes, another Slosh product) a great job of bridging the gap between the generations. In the vast majority of situations users will experience flawless texture fitting. I did however notice that there is some stretching around the naval, and more significantly, at the back of the neck and extending down the spine. The worst of the stretching occurs higher up, and tapers away moving further down the back.
If I hadn’t used the Lazarus texture set with its extensive tattoos, then I might never have noticed the issue. Slosh has stated that, given the complexity of the task, he would work on updating the product to fix the issue only if it caused problems for a significant portion of users. So, I’d suggest if this is an issue for you, not to dismiss the product or go for the refund (if you already own it), but to ask for a fix.

M6 Only works with M4 Materials/Textures in .duf file format? The Workaround

One slight hitch in getting the bulk of our M4 texture presets to work with Michael 6/G2M is that the process only works with material presets that are saved in the newer .duf format. None of the older formats are supported. There are a few ways around this, the slowest of which is to load all the textures manually from their location in the runtime.

The quicker approach is to load your material/character preset onto Michael 4 and save as a material preset. Here’s the basic workflow (this also applies to V6, for those wondering).

1. Load M4 > load character/textures set > navigate to the “File” menu > “Save As” > “Material Preset” > name your preset + “Ok > pressing “Ok” in the next pop-up is fine unless you only want to save specific settings for specific surfaces
2. Load M6 or Genesis 2 M > content library (tab) > DAZ Studio Formats > DAZ Studio Library > People > Presets > Materials > select your saved preset

A Brief Word On The Michael 6 Pro/Starter Bundles

As with Victoria 6 bundles, the M6 bundles come packed with additional content at a fraction of the price of purchasing the products individually. For some users this is great – no problem; throw it in the cart, but for many others the bundles contain only a couple of products of interest. For some, the issue here is that the genitals only come with the pro bundle, which means you have to fork out a pile of cash (relative pile) for content they couldn’t care less about.

The other issue is that this so called pro bundle really isn’t that pro. It contains the base figure, a few character sets, hair, props, AND GENITALS, but the M4 Shapes For Genesis 2 Male and the Genesis 2 Male Morphs are separate purchases. It is these items that are the meat and potatoes of the M6/G2M products (as were the corresponding female products for V6). With the M4 Shapes there is some argument that DAZ couldn’t swing the deal to get the third party product into the bundle, but their very own morphs set…? Without the morphs bundle (head and body) your ability to customise and morph M6 and G2M are somewhat limited, especially for those not savvy with modelling software.

The M6 Pro Bundle, like its V6 counterpart, is all shiny stocking filler and little actual utility, and utility is what pro is meant to be all about, right? So really DAZ have it all wrong. Their pro bundles are enthusiast bundles, but then a lot of enthusiasts won’t be happy either because the included content won’t fit their particular tastes. Never the less, pro bundles sell like… I don’t know. Crack? Good enough? V6 and M6 Crack Bundles.

The only real reason to buy the bundles is if you like the included content and can see yourself using them. This is not to say the included content is bad. Everything I have tested in the M6 bundle is of a very good quality. Having the texture sets, hair, poses and apparel can be a great asset, but only if you are reasonably sure you need (or want) them. And then there are the GENITALS. If you need these then you have little choice but to go PRO.

So what does Jim actually suggest after the analysis?

  • 1. Unless you need the extra detail (geometry, weights and rigging), or like to stay current and up to date with content, then there really is no need to move to G2 at all. I, like many, happen to like new toys and extra details.
  • 2. Don’t buy bundles unless you would otherwise buy enough of the included content as separate items that would it would exceed the value of the bundle (economics 101). Or might need GENITALS.
  • 3. Unless you are a Hexagon or Zbrush ninja you will likely find yourself in need of products like DAZ’s Male Morphs Bundle.
  • 4. If you buy the above I can’t stress the value of Zevo’s products like Shape Shift enough – his products really bring a new level of customisation to G2 (and G1).
  • 5. If you have a large collection of Michael 4 content then picking up Michael 4 Shapes for Genesis 2 Male is a great way to get more value out of old content while filling out the content wardrobe. So in that sense even new users of DAZ Studio and Poser can benefit from the vast catalogue of M4 content.
  • 6. Don’t expect miracles from the auto-fit tools.
  • 7. Zombies!

And there it is. I know I’m too late to help out the community junkies with their decision, but let’s be honest, most of you had already decided before release. So why are you reading this? Did I inform and entertain? I hope so. For those sitting on the fence, I hope I helped you come to a decision. And the same goes for any newbies out there that have found themselves here. To the latter I wish you as much joy and obsession as 3D has given me over the last couple of years. To everyone else, happy renderings.


Don’t forget to SUBSCRIBE via our easy to use RSS and RSS email feed to stay up to date with DigiSprawl posts.